
MongoDB Atlas란?
- MongoDB의 완전 관리형 클라우드 데이터베이스 서비스
- 데이터베이스를 클라우드에서 호스팅 하고 관리하는 것을 중심으로 함
- 개발자 및 기업이 손쉽게 애플리케이션을 빌드하고 배포할 수 있도록 지원함
- AWS, Azure, GCP를 통해 배포에 관한 모든 것을 통합 관리해 줌
- 클라우드 환경에서 사용할 수 있으며 나의 컴퓨팅 자원을 소모하지 않고 사용할 수 있는 원격 DB가 생성됨
MongoDB Atlas 다운로드
MongoDB Atlas: Cloud Document Database
Cloud-hosted MongoDB service on AWS, Azure, and GCP
www.mongodb.com
- Start Free 누른 후 가입하기
- 가입 후 파일 다운로드
- 다운로드 완료
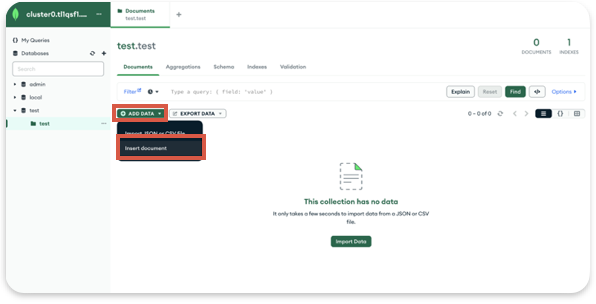
- test > test에 데이터 입력하기
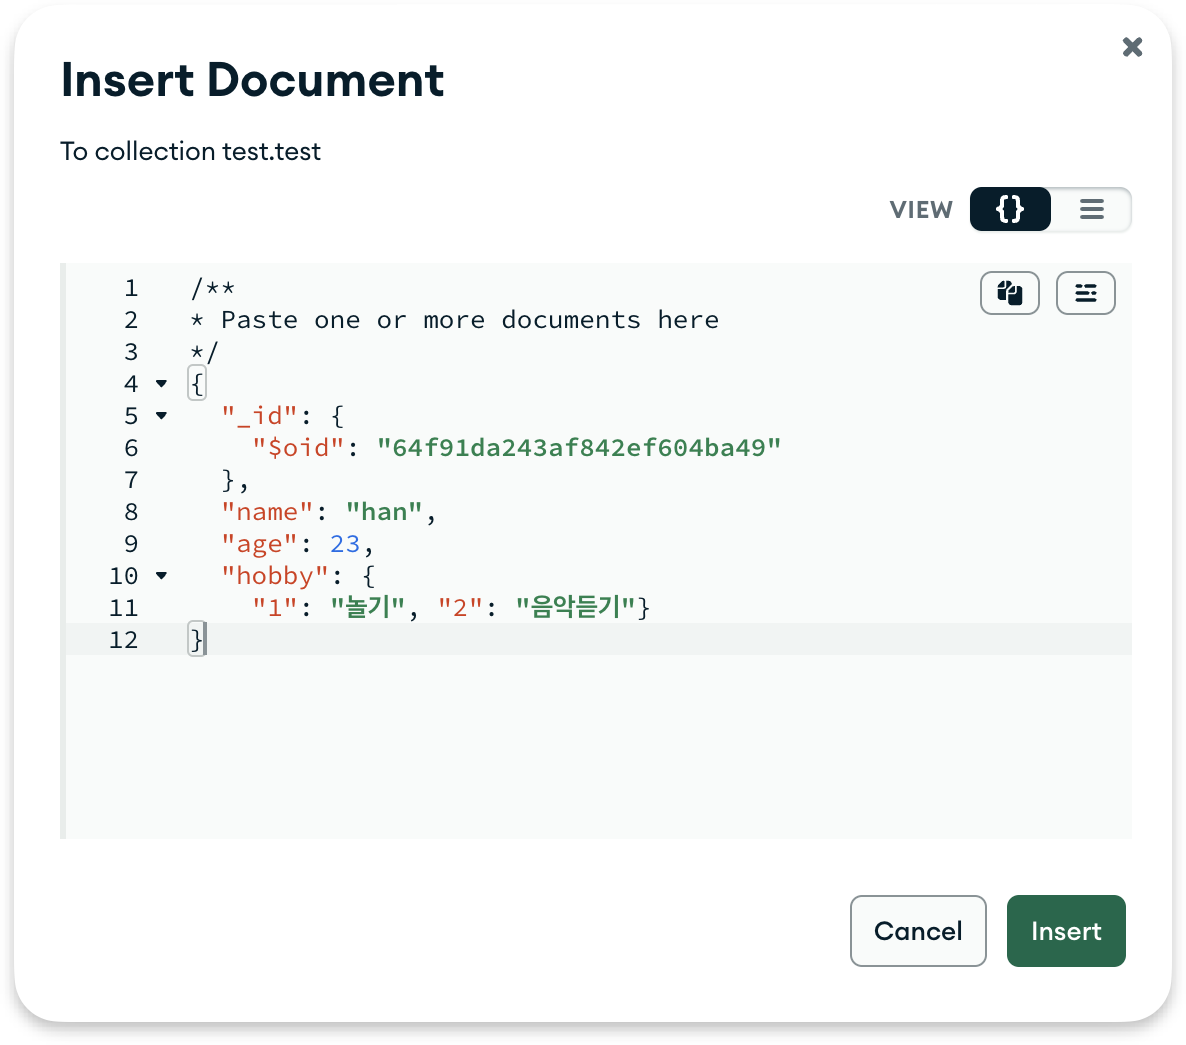
- Json 형식으로 key와 value를 입력하기
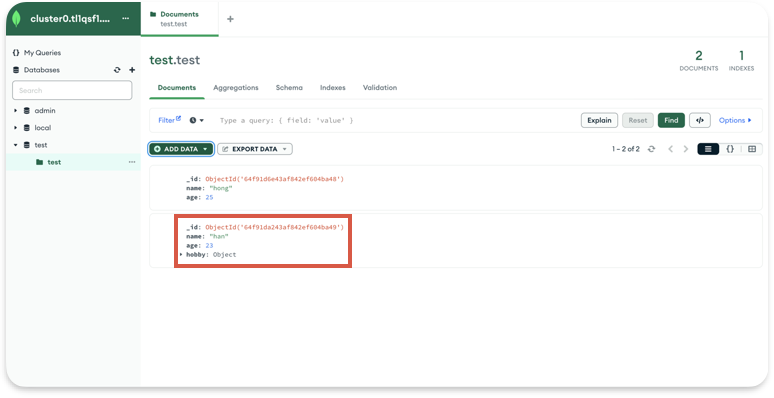
- 입력한 값이 잘 들어감
MongoDB와 JAVA 연결하기
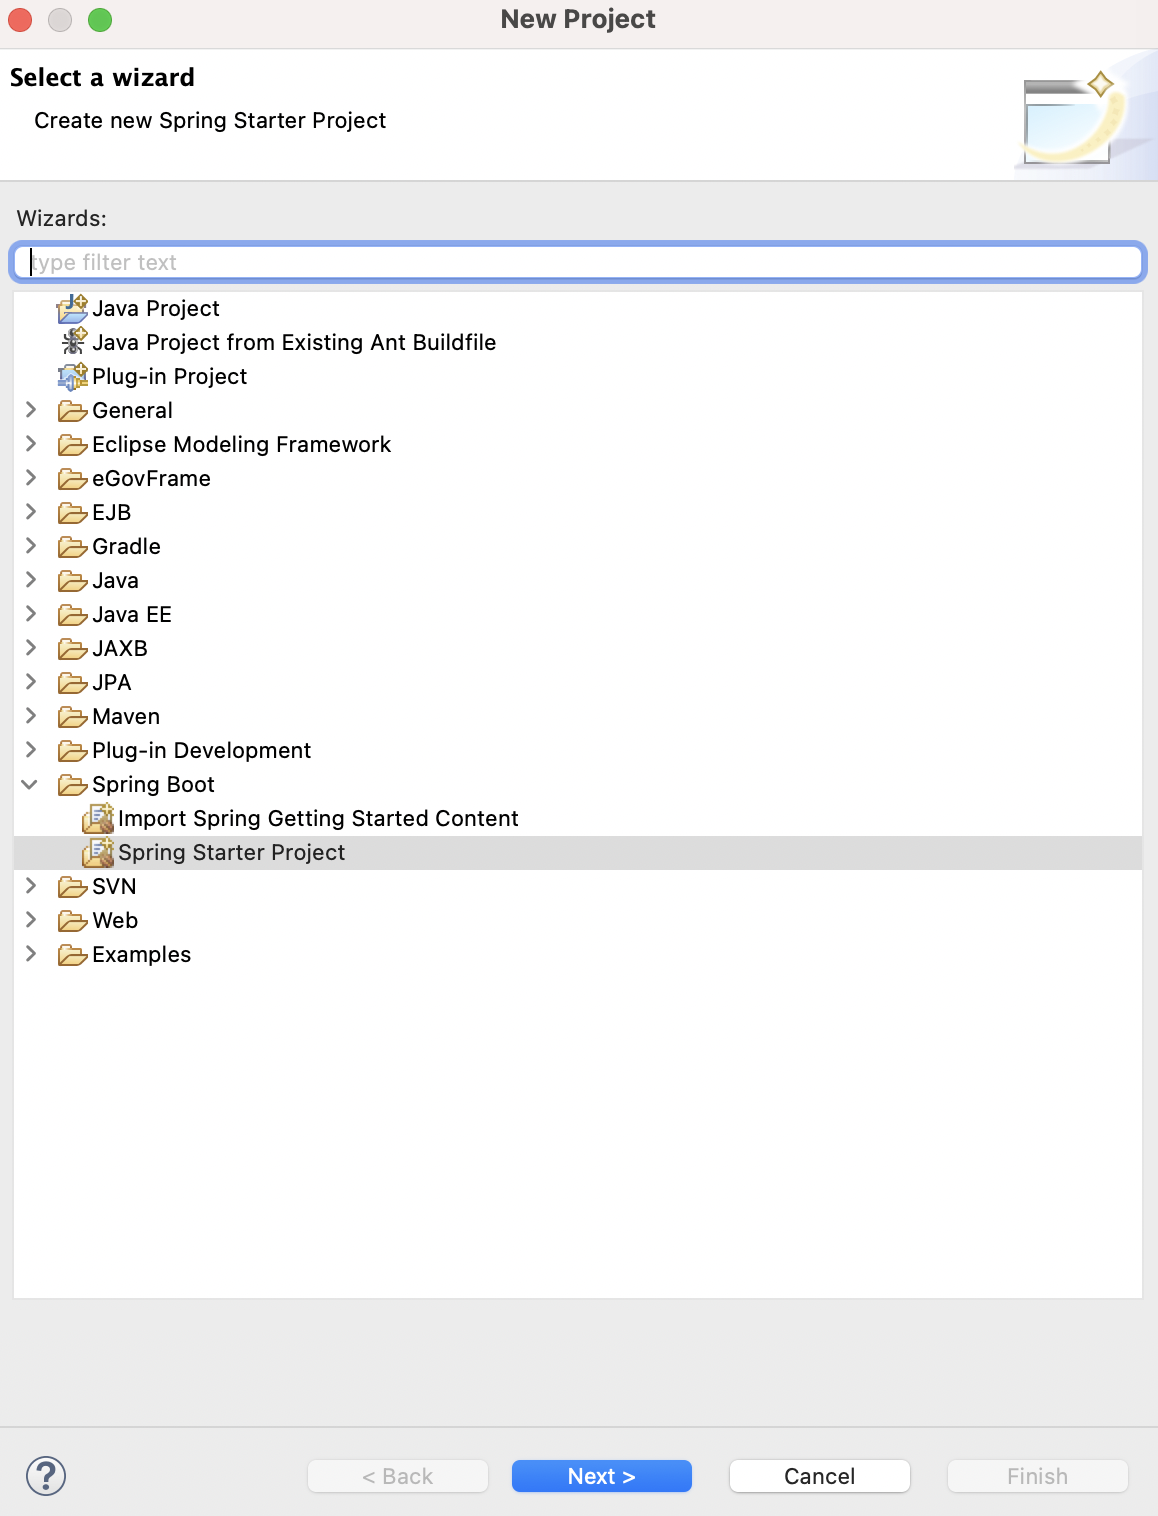
01) 새로운 project 생성
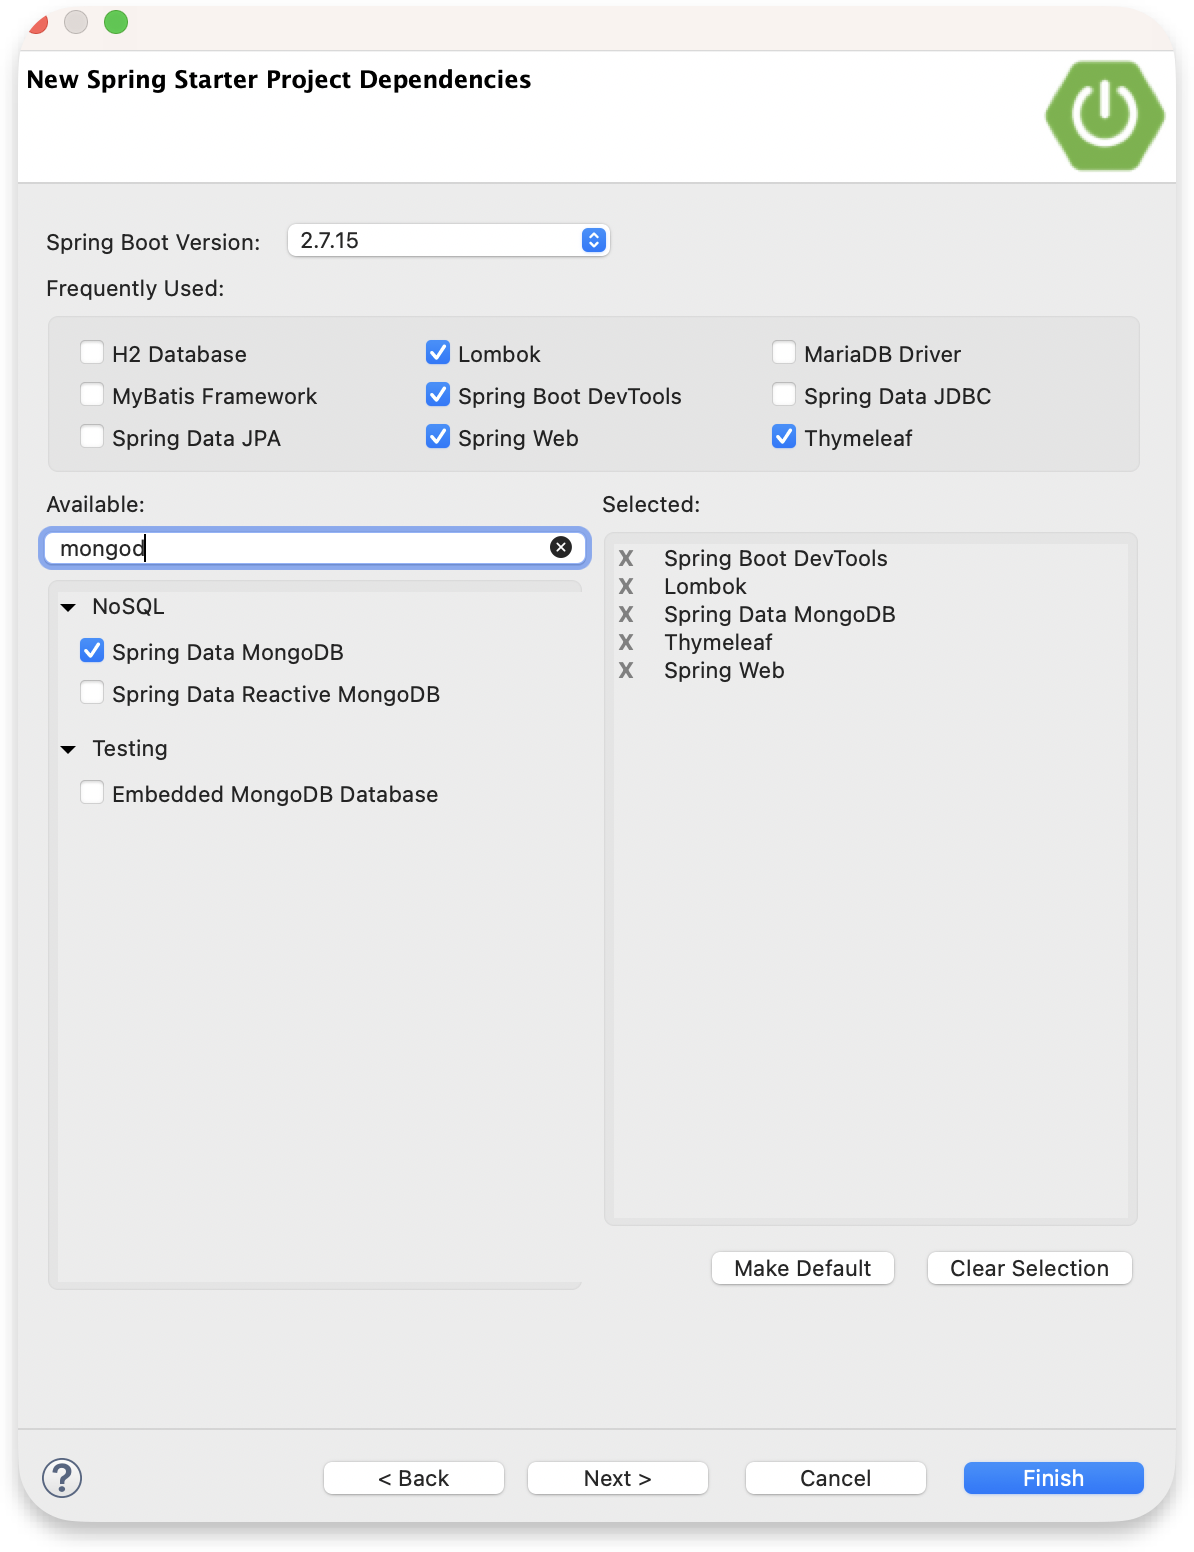
02) Application.properties 설정
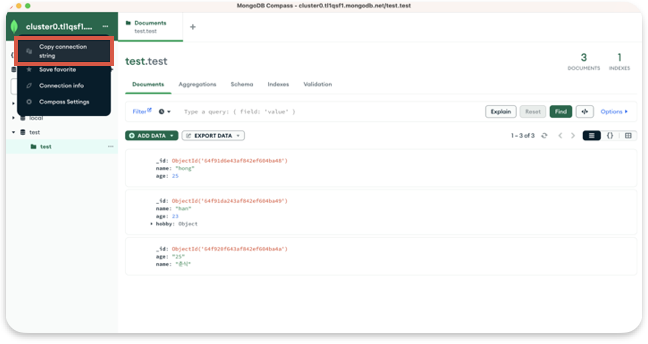
- 위와 같이 접속 정보를 확인한 후 아래의 코드에서 uri에 붙여 넣기
server.port=80

# thymeleaf호출시 경로 설정
spring.thymeleaf.cache=false
spring.thymeleaf.prefix=classpath:/templates/
spring.thymeleaf.suffix=.html

## MongoDB Config ##
spring.data.mongodb.uri=mongodb+srv://id:password@cluster0.tl1qsf1.mongodb.net/
spring.data.mongodb.database=name
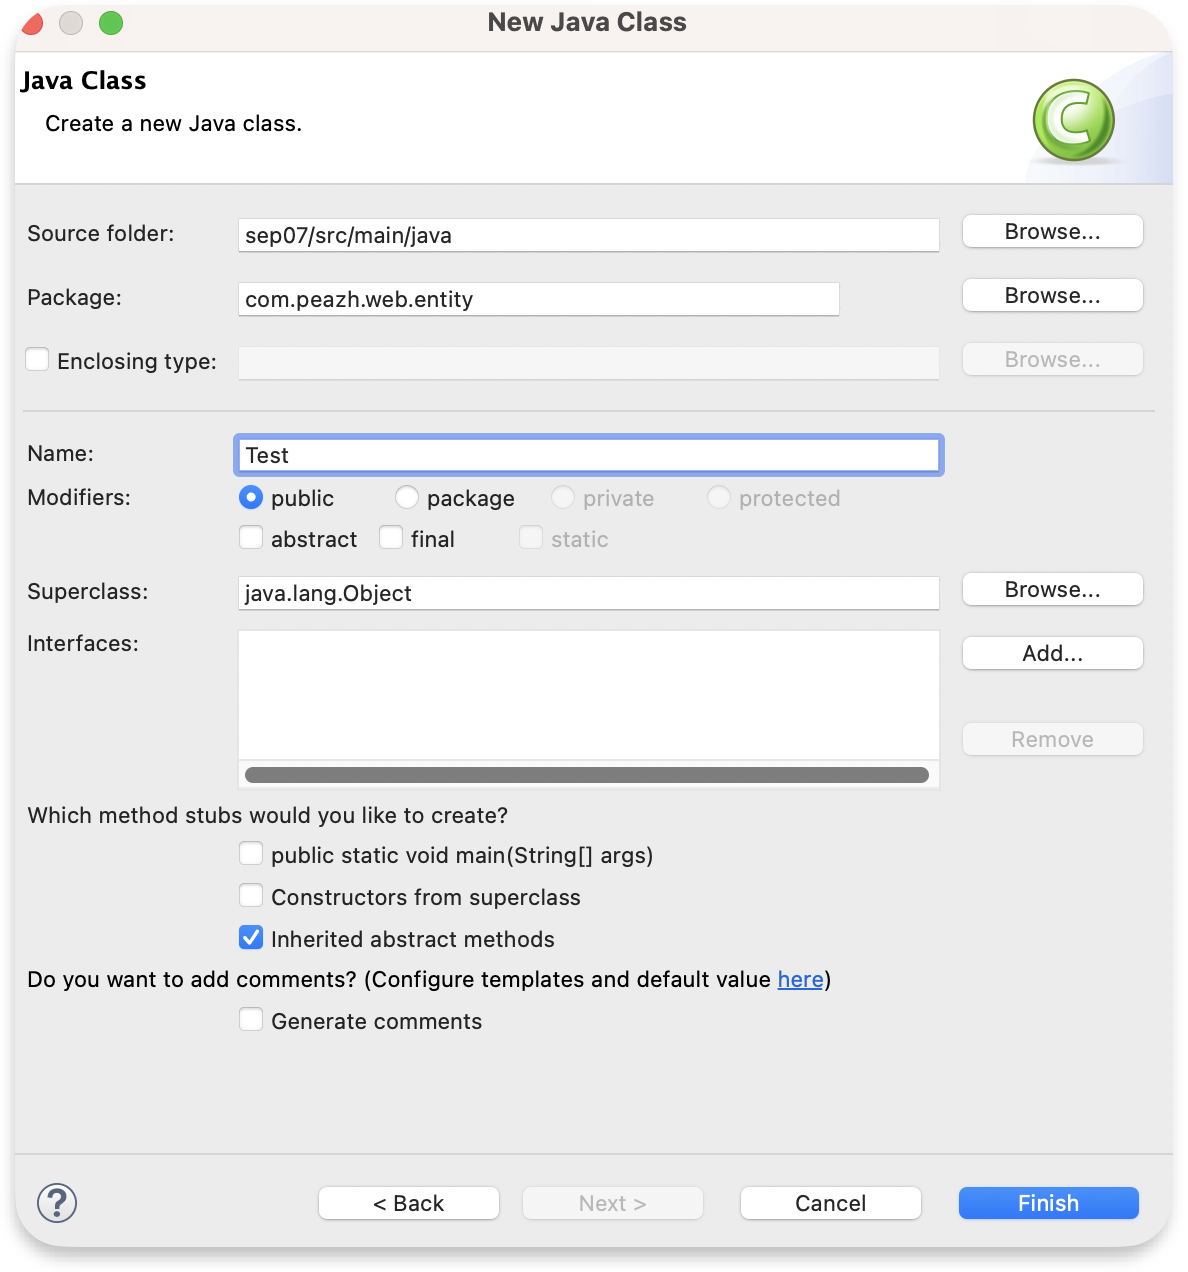
03) Test.java 생성
- 데이터베이스 테이블과 일치하는 객체 설정하기
package com.peazh.entity;
import java.util.Map;
import org.springframework.data.annotation.Id;
import org.springframework.data.mongodb.core.mapping.Document;
import lombok.AllArgsConstructor;
import lombok.Data;
import lombok.NoArgsConstructor;
@Data
@Document(collection = "test") //mongoDB에서 연결할 테이블명 입력
@AllArgsConstructor
@NoArgsConstructor
public class Test {
@Id
private String id;
private int age;
private String name;
private Map<String, String> hobby;
}- @AllArgsConstructor : 모든 필드를 매개 변수로 받아 객체를 생성할 때 사용할 수 있는 생성자를 만들어 줌
- @NoArgsConstructor : 매개변수가 없는 기본 생성자를 자동으로 생성함
04) TestController.java 생성
package com.peazh.controller;
import java.util.List;
import org.springframework.beans.factory.annotation.Autowired;
import org.springframework.stereotype.Controller;
import org.springframework.ui.Model;
import org.springframework.web.bind.annotation.GetMapping;
import com.peazh.entity.Test;
import com.peazh.service.TestService;
@Controller
public class TestController {
@Autowired
private TestService testService;
@GetMapping("/test")
public String test(Model model) {// 데이터베이스의 값을 저장하고 타임리프로 보내주는 역할
List<Test> list = testService.list();
model.addAttribute("list",list);
return "test";
}
}
05) TestService.java 생성
package com.peazh.service;
import java.util.List;
import org.springframework.beans.factory.annotation.Autowired;
import org.springframework.stereotype.Service;
import com.peazh.entity.Test;
import com.peazh.repository.TestRepository;
@Service
public class TestService {
@Autowired
private TestRepository testRepository;
public List<Test> list() {
return testRepository.findAll();
}
}
06) TestRepository.java 생성 (interface)
package com.peazh.repository;
import org.springframework.data.mongodb.repository.MongoRepository;
import com.peazh.entity.Test;
//MongoRepository 자체가 값을 자동으로 만들어줌
public interface TestRepository extends MongoRepository<Test, Long>{
}
07) test.html 생성
<!DOCTYPE html>
<html lang="ko" xmlns:th="http://thymeleaf.org">
<head>
<meta charset="UTF-8">
<title>test</title>
</head>
<body>
[[${list}]]
</body>
</html>
MongoDB로 Board 만들기
01) Board.java 생성
package com.peazh.entity;
import java.time.LocalDateTime;
import org.springframework.data.annotation.Id;
import org.springframework.data.mongodb.core.mapping.Document;
import lombok.AllArgsConstructor;
import lombok.Data;
import lombok.NoArgsConstructor;
@Data
@Document(collection = "board")
@NoArgsConstructor
@AllArgsConstructor
public class Board {
@Id
private String id;
private String title;
private String content;
private LocalDateTime date;
private String name;
private String img;
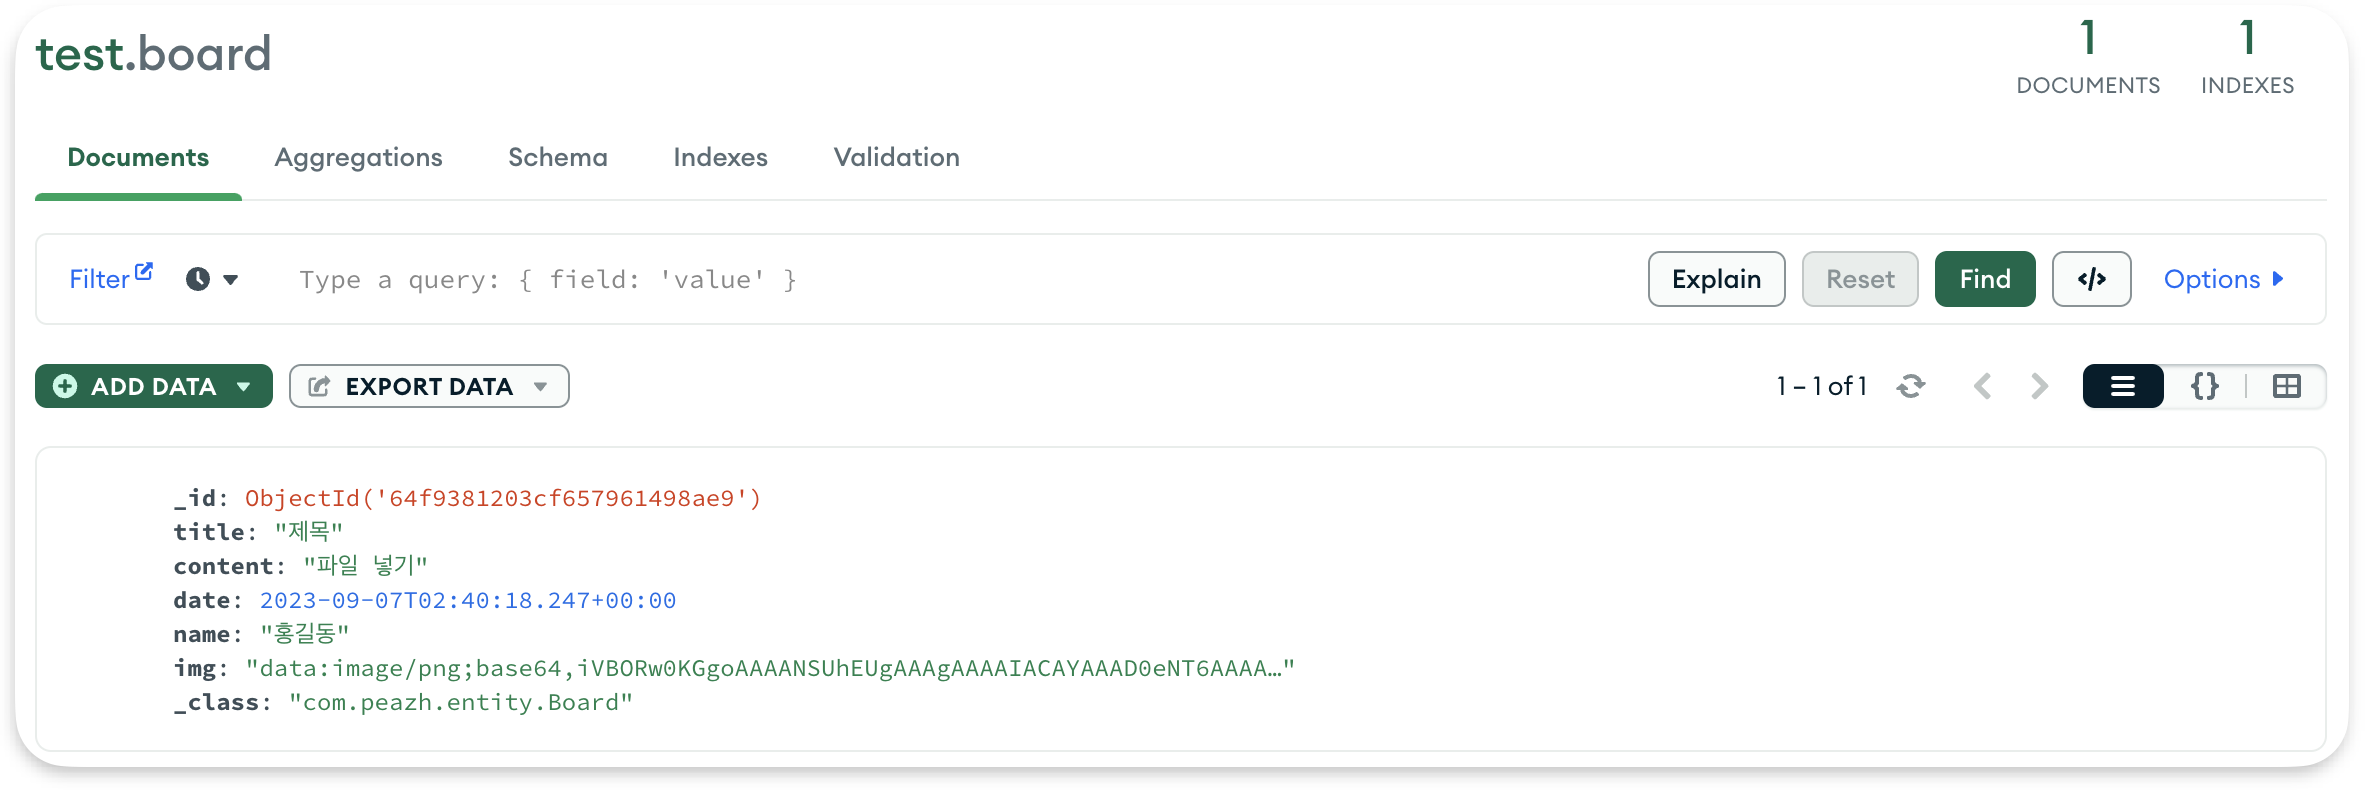
}- 보드 테이블 예시
{
"_id": {
"$oid": "64f6b6bb874910553a75f88f"
},
"title": "그림",
"content": "그림",
"date": {
"$date": "2023-09-05T05:03:55.009Z"
},
"name": "홍길동"
}
02) BoardController.java 생성
package com.peazh.controller;
import java.util.List;
import org.springframework.beans.factory.annotation.Autowired;
import org.springframework.stereotype.Controller;
import org.springframework.ui.Model;
import org.springframework.web.bind.annotation.GetMapping;
import com.peazh.entity.Board;
import com.peazh.service.BoardService;
@Controller
public class BoardController {
@Autowired
private BoardService boardService;
// 게시판 가져오기
@GetMapping("/board")
public String board(Model model) {
List<Board> list = boardService.list();
model.addAttribute("list",list);
return "board";
}
}
03) BoardService.java 생성
package com.peazh.service;
import java.util.List;
import org.springframework.beans.factory.annotation.Autowired;
import org.springframework.stereotype.Service;
import com.peazh.entity.Board;
import com.peazh.repository.BoardRepository;
@Service
public class BoardService {
@Autowired
private BoardRepository boardRespository;
public List<Board> list() {
return boardRespository.findAll();
}
}
04) BoardRepository.java 생성
package com.peazh.repository;

import org.springframework.data.mongodb.repository.MongoRepository;

import com.peazh.entity.Board;

public interface BoardRepository extends MongoRepository<Board, Long> {

}
05) board.html 생성
<!DOCTYPE html>
<html lang="ko" xmlns:th="http://thymeleaf.org">
<head>
<meta charset="UTF-8">
<title>BOARD</title>
</head>
<body>
[[${list}]]
<button th:onclick="|location.href='@{/write}'|">작성하기</button>
</body>
</html>
Board에서 글 작성하기
01) BoardController.java 수정
// 게시판 작성하기
@GetMapping("/write")
public String write() {
return "write";
}
// 작성한 값 가져오기
@PostMapping("/write")
// 입력된 값을 img는 img로 받고 나머지는 request로 받음
public String write(@RequestParam("img") MultipartFile img, HttpServletRequest request) throws IOException {
Board board = new Board();
board.setTitle(request.getParameter("title"));
board.setContent(request.getParameter("content"));
board.setName("홍길동");
board.setDate(LocalDateTime.now());//현재시간
if(img.getSize() > 0) {// 파일 입력한게 0보다 클 경우 = 파일이 있을 경우
String fileName = img.getOriginalFilename();// 파일을 fileName으로 저장할 것
// 파일명 .뒤에 있는 글자(확장자명)가 jpg, gif, png로 끝날 경우
if(Pattern.matches("([^\\s]+(\\.(?i)(jpg|gif|png))?)", fileName)) {
// 문자열로 표현된 이미지 데이터를 바이트 배열로 변환하고, 그 바이트 배열을 Base64로 인코딩하기
// 그림을 바이트 단위로 깨서 저장하기
byte[] img2Byte = Base64.encodeBase64(img.getBytes());
// Base64로 인코딩된 이미지 데이터를 특정 형식의 문자열로 저장하기
board.setImg("data:image/png;base64," + new String(img2Byte));
}
}
boardService.save(board);
return "redirect:/board";
}
02) BoardService.java 수정
public void save(Board board) {
boardRepository.save(board);
}
03) write.html 생성
<!DOCTYPE html>
<html lang="ko" xmlns:th="http://thymeleaf.org">
<head>
<meta charset="UTF-8">
<title>WRITE</title>
<script type="text/javascript">
function writef(){
let title = document.getElementById('title');
let content = document.getElementById('content');
const reg = new RegExp('.jpg|.png|.gif');
// 제목을 입력 안했을 경우
if(title.value == '' || title.value == null){
document.querySelector('#result').innerText = "제목을 입력하세요.";
title.style.backgroundColor = "red";// 배경색 변경
title.style.borderColor = "#FF0000";// 테두리색 변경
title.focus();
return false;
}
title.style.backgroundColor = "write";
// 내용을 입력 안했을 경우
if(content.value == '' || content.value == null){
document.querySelector('#result').innerText = "내용을 입력하세요.";
content.style.backgroundColor = "red";// 배경색 변경
content.style.borderColor = "#FF0000";// 테두리색 변경
content.focus();
return false;
}
content.style.backgroundColor = "write";
document.getElementById('write-form').style.backgroundColor = "gray";
let file = document.getElementById("img").value;
// 파일이 있을 경우
if(file != "" || file != null){
// 파일의 마지막 글자가 jpg, gif, png일 때 확장자를 reg로 저장
const reg = /([^\s]+(?=\.(jpg|gif|png))\.\2)/;
//alert(reg.test(file));
// 확장자가 jpg, gif, png가 아닐 경우
if(!(reg.test(file))){
alert("그림파일(jpg, png, gif)만 선택 가능합니다.");
document.querySelector('#result').innerText = "그림파일(jpg, png, gif)만 선택 가능합니다.";
return false;
}
}
}
</script>
</head>
<body>
<h1>write</h1>
<div id="write-form">
<form action="./write" method="post" enctype="multipart/form-data" onsubmit="return writef();">
<input type="text" name="title" id="title">
<textarea name="content" id="content"></textarea>
<input type="file" name="img" id="img" accept=".jpg, .png, .gif">
<div id="result">그림파일(jpg, png, gif)만 선택 가능</div>
<button type="submit">write</button>
</form>
</div>
</body>
</html>

Board 글 상세 보기
01) BoardController.java 수정
@GetMapping("/detail")
public String board(@RequestParam("no") String id, Model model) {
Board detail = boardService.findById(id).get();
//Optional
model.addAttribute("detail", detail);
return "detail";
}
02) BoardService.java 수정
public Optional<Board> findById(String id) {
return boardRepository.findById(id);
}
03) BoardRepository.java 수정
Optional<Board> findById(String id);- 해당하는 id의 글을 가져와야 하므로 repository 작성해 줌
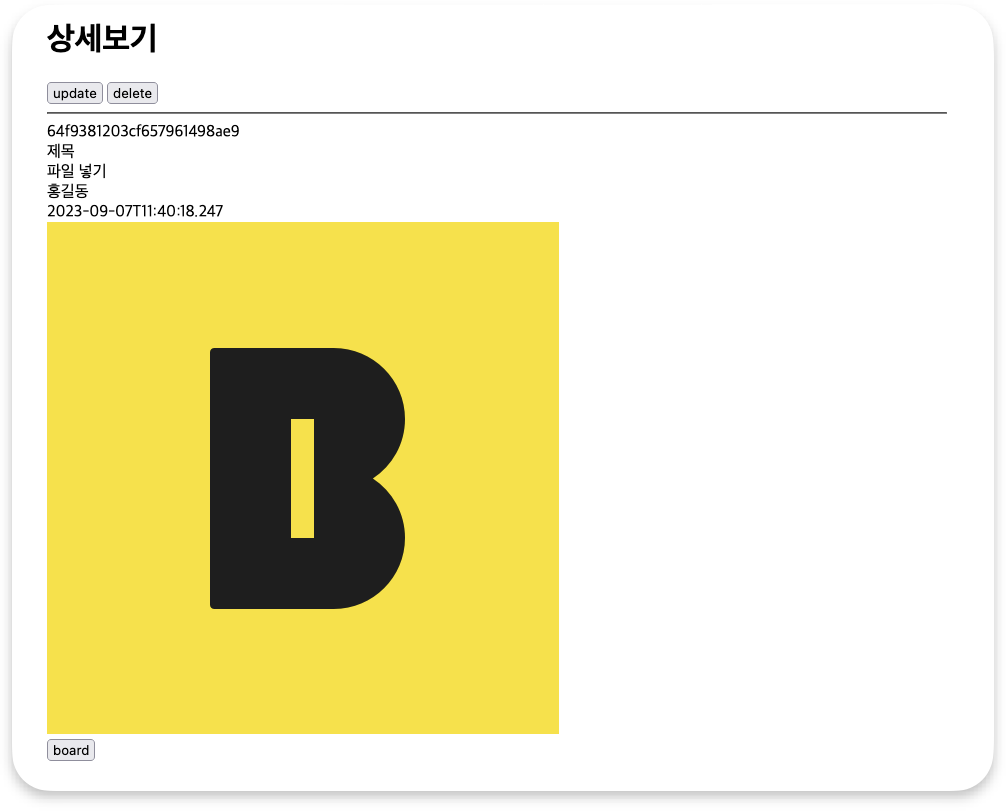
04) detail.html 생성
<!DOCTYPE html>
<html lang="ko" xmlns:th="http://www.thymeleaf.org">
<head>
<meta charset="UTF-8">
<title>Insert title here</title>
<link rel="stylesheet" type="text/css" th:href="@{./css/thymeleaf.css}">
</head>
<body>
<th:block th:insert="~{/menu.html :: menu}"></th:block>
<div class="main">
<h1>상세보기</h1>
<button th:onclick="|location.href='@{/update(no=${detail.id})}'|">update</button>
<button th:onclick="|location.href='@{/delete(no=${detail.id})}'|">delete</button>
<hr>
[[${detail.id}]]<br> [[${detail.title}]]<br>
[[${detail.content}]]<br> [[${detail.name}]]<br>
[[${detail.date}]]<br>
<div th:if="${detail.img ne null}">
<img th:src="${detail.img}">
</div>
<button th:onclick="|location.href='@{/board}'|">board</button>
</div>
</body>
</html>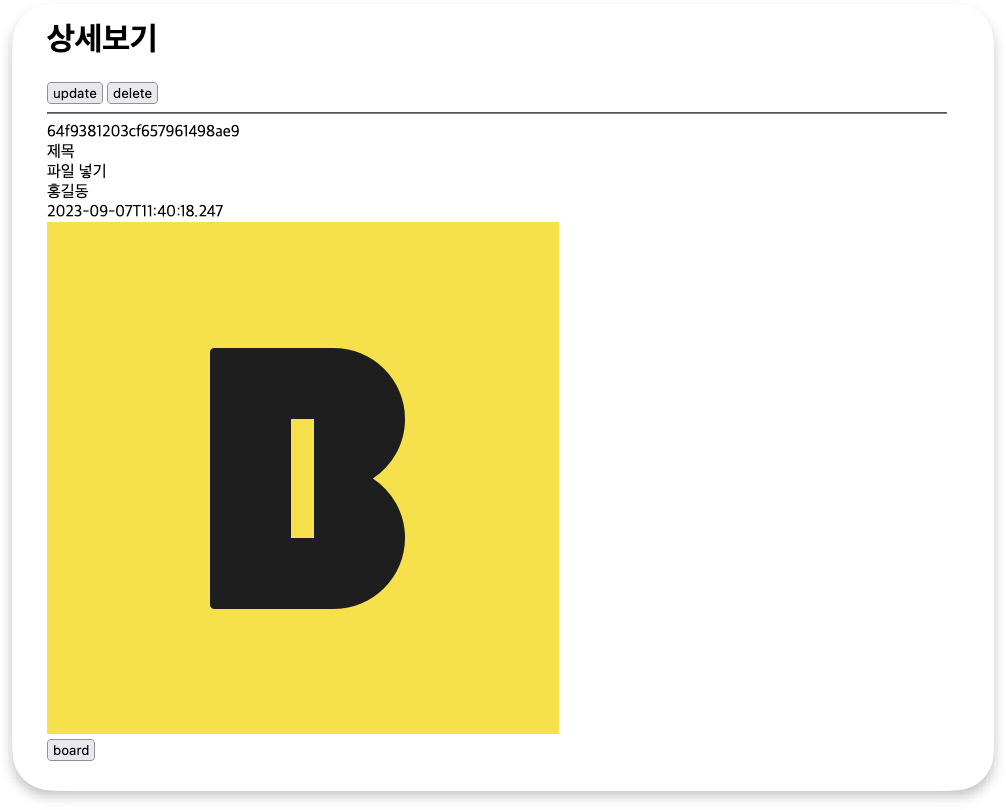
Board에 sns 만들기
01) BoardController.java 수정
@GetMapping("/sns")
public String sns(Model model) {
// 정렬 옵션
List<Sort.Order> order = new ArrayList<Sort.Order>();
// 날짜 순으로 정렬할거임
order.add(Sort.Order.desc("date"));
// 최신글 10개만 뜨기
Page<Board> list = boardService.findAll(PageRequest.of(0, 10, Sort.by(order)));
model.addAttribute("list", list);
return "sns";
}
02) BoardService.java 수정
public Page<Board> findAll(PageRequest of) {
return boardRepository.findAll(of);
}
03) sns.html 생성
<!DOCTYPE html>
<html lang="ko" xmlns:th="http://www.thymeleaf.org">
<head>
<meta charset="UTF-8">
<title>Insert title here</title>
<link rel="stylesheet" type="text/css" th:href="@{./css/thymeleaf.css}">
<style type="text/css">
.box{
width: 500px;
height: auto;
background-color: rgb(231, 231, 231);
margin: 10px;
padding: 10px;
}
.box img{
width: 500px;
}
</style>
</head>
<body>
<th:block th:insert="~{/menu.html :: menu}"></th:block>
<div class="main">
<button th:onclick="|location.href='@{/write}'|">글쓰기</button>
<th:block th:each="row : ${list}">
<div class="box">
[[${row.title}]]
[[${row.name}]] / [[${row.date}]]
<hr>
[[${row.content}]]
<div th:if="${row.img ne null}">
<img th:src="${row.img}">
</div>
</div>
</th:block>
</div>
</body>
</html>
Board 글 삭제하기
01) BoardController.java 수정
@GetMapping("/delete")
public String delete(@RequestParam("no") String id) {
// id를 기준으로 찾아서 삭제하기
boardService.deleteById(id);
return "redirect:/board";
}
02) BoardService.java 수정
public void deleteById(String id) {
boardRepository.deleteById(id);
}
03) BoardRepository.java 수정
void deleteById(String id);
- 글 상세 보기에서 삭제하기 버튼 클릭
- 해당 글이 삭제되어 게시판에 글이 없음

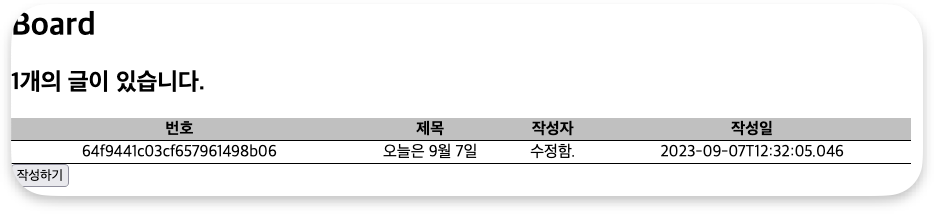
Board 작성한 글 수정하고 글의 개수 가져오기
01) BoardController.java 수정
@GetMapping("/update")
public String update(@RequestParam("no") String id, Model model) {
Board detail = boardService.findById(id).get();
model.addAttribute("detail", detail);
return "update";
}
@PostMapping("/update")
public String update(Board board) {
board.setName("수정함.");
board.setDate(LocalDateTime.now());// 수정한 시간으로 변경
boardService.save(board);
return "redirect:/board";
}
// 작성한 글 개수 가져오기
@GetMapping("/board")
public String board(Model model) {
int count = boardService.count();
model.addAttribute("count",count);- save는 이미 생성했으므로 service나 repository에 생성 안 해줘도 됨
02) BoardService.java 수정
public int count() {
return (int) boardRepository.count();
}
03) update.html 생성
<!DOCTYPE html>
<html lang="ko" xmlns:th="http://www.thymeleaf.org">
<head>
<meta charset="UTF-8">
<title>수정하기</title>
<link rel="stylesheet" type="text/css" th:href="@{./css/thymeleaf.css}">
<link rel="stylesheet" type="text/css" th:href="@{./css/write.css}">
</head>
<body>
<th:block th:insert="~{/menu.html :: menu}"></th:block>
<div class="main">
<h1>update</h1>
<div class="write-form">
<form action="./update" method="post">
<input type="text" name="title" th:value="${detail.title}">
<textarea name="content">[[${detail.content}]]</textarea>
<input type="hidden" name="id" th:value="${detail.id}">
<button type="submit">수정</button>
</form>
</div>
</div>
</body>
</html>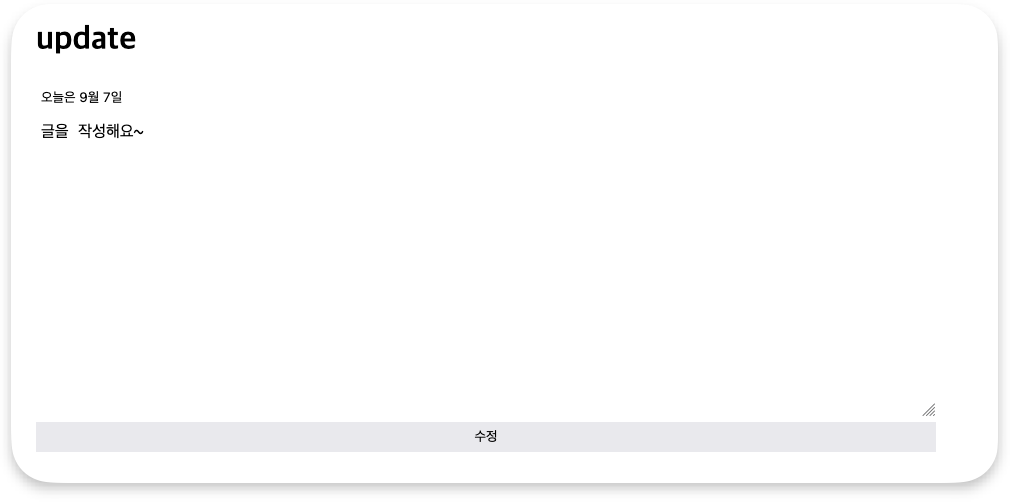


댓글